echo backpack blower service manual

Find a Specific Product: BR 450 C-EFThe world's only professional backpack blower with electric start. 5. 35 by from 55 by from 55 by from 25 by from 15 by from 45 by from 35 by from 55 by from BR 450 C-EF Reviews - page 2Parts Catalog Complete 2016 1 Parts Catalog 2016-1 Sections A-B.pdf Parts Catalog 2016-1 Sections C-D.pdf Parts Catalog 2016-1 Sections E-I.pdf Parts Catalog 2016-1 Sections J-M.pdf Use the search field below to find your instruction books. 250_350 Gallon Front Tanks.pdf 3 PT Hitch Delta Eagle SPC.pdf 3 PT Hitch Eagle Boom.pdf Arrow 270_400 16 inch MAXI Fan.pdf Arrow 270_400 22 inch Fan B20.pdf Arrow 270_400 30 inch Fan.pdf Bravo 500 22 inch Fan.pdf CM Plus 1200 Eagle.pdf CM Plus 1200 Force.pdf CM Plus 750 Eagle.pdf CM Plus Twin Force 750.pdf CM Plus Twin Force 875_1200.pdf CM Twin Force 875_1200.pdf Condor 500 32 inch Fan.pdf ES Trailer 12 Volt.pdf ES Trailer Gas Engine.pdf
LB50 22 inch Fan.pdf LE-SPV 100_150 16 inch MAXI Fan.pdf LE100_150 30 inch Fan.pdf LP Cannon 100_150 22 inch Fan.pdf LP100_150 22 inch Fan.pdf Mega 230_350 Centrifugal Eagle.pdf Mega 230_350 Diaphragm Eagle.pdf Mercury 600 26 inch Fan B40.pdf Mercury 600 32 inch Fan.pdf Mercury 600 36 inch Fan.pdf Nav 3000_4000 Centrifugal Eagle.pdf
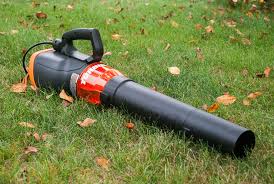
backpack vorbereitung Pro Features, Affordable Price
issey miyake backpack ebay 185 MPH / 510 CFM
tuareg backpack Large 42cc engine for excellent clearing power
booq boa laptop backpack Unique engine mounting delivers powerful air force
gregory backpack jade 28
Adjustable shoulder harness for maximum user comfort Variable speed and cruise control for convenient operation Engine: 42cc 2 Stroke Engine Air Velocity: 185 MPH/ 510CFM Trigger: Variable Speed Throttle Throttle Control Handle Tube 2 Cycle Engine Lubricant What is the correct fuel mixture to use with my 2 cycle engine RYOBI Outdoor Product?
backpack vakantie griekenland Your 2-cycle engine requires pre-mixing gasoline and 2-cycle lubricant.
backpacker mandolinPre-mix unleaded gasoline and 2-cycle engine lubricant in a clean gas container. DO NOT mix quantities larger than usable in a 30-day period. Do not use automotive lubricant or 2-cycle outboard lubricant. We recommend using a RYOBI/Homelite premium 2-cycle oil or a PowerCare 2-cycle oil. Clean surface around fuel cap to prevent contamination

Loosen fuel cap slowly. Rest the cap on a clean surface. Carefully pour fuel into the tank. Prior to replacing the fuel cap, clean around the gasket. Immediately replace fuel cap and hand tighten. Wipe up any fuel spillage Note: it is normal for smoke to be emitted from a new engine after fist use. How do I adjust the harness on the backpack blower? Note: Adjust the straps to a comfortable position before you start the blower The blower should be in the operating position before adjusting the harness straps Slip your arm through the harness strap and onto one shoulder, then repeat for the other shoulder Grasp the lower adjustment strap and tighten (pull down on strap) until the backpack blower rests comfortably against the small of your back Next, grasp the upper adjustment straps and tighten (pull down on strap) until the backpack blower fits comfortably on the shoulders Once the blower feels comfortable, secure the chest strap

How do I assemble the blower tubes on my backpack blower? Place a large tube clamp onto the outer slot of the upper (wider) end of the bellows Attach upper end of bellows onto blower housing by sliding it over the air outlet The raised ridge closest to the air outlet should securely fit into the slot inside the bellows when the bellows are properly installed Tighten the large tube clamp using the assembly tool and place a tube clamp on other end of bellows Then press bellows onto throttle control handle tube and tighten the small tube clamp using the assembly tool NOTE: The position of the throttle control handle may be adjusted for comfort after the blower is strapped onto the operator’s back Join the straight tube and nozzle together by aligning raised locking tabs on straight tube with the raised locking slots on nozzle and twist to secure Assemble the connected lower tubes to the throttle control handle tube by aligning raised locking tabs on the throttle control handle tube with the raised locking slots on connected lower tubes by twisting to secure

NOTE: Check all locking connections after initial run to ensure they are tightly secured CAUTION: Make all adjustments to the harness straps before starting the blower to avoid the possibility of injury. How do I fill the fuel tank on the backpack blower? Loosen the fuel cap slowly by turning counterclockwise and rest the cap on a clean surface Carefully pour fuel into the tank and make sure to avoid spillage Prior to replacing the fuel cap, clean and inspect the gasket Immediately replace fuel cap and hand tighten by turning it clockwise Wipe up any fuel spillage Move at least 30 ft. away from refueling area before starting the product WARNING: Check for fuel leaks, which are a fire hazard. Failure to do so could result in a fire that could cause serious personal injury. NOTE: It is normal for smoke to be emitted from a new engine after first use. WARNING: Always shut off engine before fueling. Never add fuel to a machine with a running or hot engine.
Move at least 30 ft. from refueling site before starting engine. Do not smoke and stay away from open flames and sparks. Failure to safely handle fuel could result in serious personal injury. How do I start and stop the backpack blower? Blower should be on a flat, bare surface for starting Slowly press the primer bulb 10 times NOTE: After the 10th press, fuel should be visible in the primer bulb. If it is not, continue to press the primer until you see fuel in the bulb. Unlock the cruise control (set to Idle) Set the choke lever to the START position A Pull starter grip sharply until engine attempts to run Note: Do not pull the starter grip more than five (5) times. Set the choke lever to the RUN position B Pull the starter grip and rope until the engine runs Note: Do not pull the starter grip more than six (6) times. NOTE: If the engine does not start, return to the START position and repeat the steps that follow. Allow the engine to run for 10 seconds before using the blower.

TO STOP THE ENGINE: To stop the engine, depress the STOP switch to the stop position “ O ” HOT RESTART OF THE ENGINE: Set the choke lever to the RUN position Lock the cruise control Then pull the starter grip until the engine runs How do I use the cruise control on the backpack blower? The cruise control can be used to operate the blower without holding the throttle trigger To engage the cruise control: Push cruise control lever down and stop at the desired throttle setting. To release the cruise control, pull cruise control lever all the way up How do I clean the exhaust port on the backpack blower? NOTE: Depending on the type of fuel used, the type and amount of lubricant used, and/or your operating conditions, the exhaust port, muffler, and/or spark arrestor screen may be¬come blocked with carbon deposits. If you notice a power loss with your gas powered tool, you may need to remove these deposits to restore performance.

We highly recommend that only qualified service technicians perform this service. WARNING: Never run the blower without a muffler equipped with a spark arrestor in place. How do I store the backpack blower for less than one month? Clean all foreign material from the product Store it in a well-ventilated place that is inaccessible to children and keep away from corrosive agents such as garden chemicals and de-icing salts Abide by all Federal and local regulations for the safe storage and handling of gasoline How do I store the backpack blower for more than 1 month? Drain all fuel from tank into a container approved for gasoline Run engine until it stops 42cc Backpack Blower - Model RY08420A, RY42BPEMC 42cc Backpack Blower - Model RY08420, RY08420A Click the link below to access outdoor products replacement parts schematics and order parts online. For those customers that prefer ordering by phone, simply contact the Ryobi master parts distributor at toll free 1-877-545-4110, and place your order over the phone.