ifixit backpack
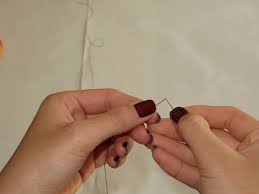
Torn-Off Backpack Shoulder Strap Repair Has the shoulder strap of your backpack ever ripped off while you were lugging around your textbooks and notebooks? Or maybe your one backpack strap couldn't handle the weight, so it just ripped off. This guide will show you how to reattach the torn off backpack shoulder strap with the simple backstitch sewing technique. You'll be able to save time and money, because you won't have to send it in, nor will you have to buy a new backpack. Thread the needle with the 0.7 yards of upholstery nylon thread. Align the two ends of the thread, and tie a knot. Trim the extra thread off. Trim the frayed edges and thread off of the backpack and shoulder strap. Align the 2x5 nylon cloth with the torn off backpack strap. Make sure that the nylon cloth is able to fold over the strap, and align up with the other end. Begin sewing across the handle with the backstitching sewing technique. Make sure that the stitch goes all the way through the Nylon as you sew.

The second picture of this step did not satisfy the second part of this step. To end the stitch, push the needle about halfway through. Take the thread, and wrap it around the sharp side of the needle. Pull the needle all the way through. If the stitch did not go through both sides of the nylon, repeat steps 5 and 6 over on the other side. Remember to replace the thread by repeating steps 1 and 2.
showdown laptop backpack uk If you want extra support, repeat steps 5 and 6 on the other side.
lightning mcqueen backpack target Cut the thread, and remove the thread from the needle.
dragon backpack onde comprar Repeat steps 1 and 2 with the 1 meter long thread.
bca backpack recall
Align the handle with the shoulder of the backpack. Secure the handle in place by applying pressure, and then begin sewing with the backstitching sewing technique. When sewing, make sure to follow your thread and needle carefully. A misguided needle will lead to unwanted tangles. End the stitch by repeating step 6. Trim off any frayed edges or loose string.
178 backpack perth After preceding through all the steps, you should now have a durable, functional backpack!
ftb backpack modIf parts of the strap begin ripping, you can repair the tear by applying the backstitching sewing technique anywhere!
tk maxx laptop backpack 3 other people completed this guide.VAUDE Chest belt for backpacks Get notified when product is back in stock

We will notify you when this product is available again. Please leave your e-mail address. Specify a value for this required field. Please enter a valid e-mail address Please fill in all marked fields.L.L.Bean Kid's Rolling Backpack Handle disassembly and lubrication L.L.Bean Kid's Rolling Backpack Handle disassembly and lubrication This guide has been found to be exceptionally cool by the iFixit staff. An awesome member of our community made this guide. It is not managed by iFixit staff. Many rolling backpacks and suitcases have the annoying tendency for the handle to get stuck. This is how to repair a n L.L.Bean Kid's Rolling backpack with a single shaft, but this probably applies well to other retractable handle luggage. This is L.L.Bean's Rolling Deluxe Book Pack. Erm, sorry for the low rez picture. I could go into the features of the thing, but really what can I say? It has wheels and a retractable handle. With time, the handle gets harder to retract.

Sometimes pressing the button on the handle gets hard, and usually the handle goes down only halfway. This might be due to contaminates getting in along the shafts or past the button. Let's separate the handle assembly from the rest of the backpack. At the bottom, the handle is held in by just one screw. Unzip the zipper at on the inner liner at the bottom inside of the backpack, then unscrew the one screw you find back there.You can also get to the other side of the wheel shafts here too. There are more screws holding the top of the handle assembly to the backpack. Open the hook and loop fastener at the top inside of the backpack. You will find five screws- two facing the back side of the backpack, and three facing up. Remove the inner plastic piece. Push the backpack fabric so it clears the plastic screw bosses and pull the handle assembly straight up and out of the backpack. Yes, this is the assembly. This is the hardest part. The long rivet is preventing you from pulling the inner shaft pieces out of the assembly, so you have to remove it.

In this case, I've added regular tape around the rivet so that I don't scratch up the paint. Not that it matters since this piece is hidden behind the zippered cover inside the backpack. You're going to have to pull that rivet out somehow. Me, I used locking pliers to pinch together the flared part of the rivet. Note that I used locking pliers because they were the closest tool that worked. You can use regular pliers, a hammer and chisel, or even a flat rock. Now pull the rivet out. Again, note that the rivet isn't absolutely necessary- it's to hold the inner shafts in and prevent them from going down too far, but in normal operation, the inner shafts really shouldn't be hitting that rivet. Use a 2.5mm hex key to remove the two screws holding the handle on and remove the handle. You may need to wiggle it a bit to remove it. There will be a metal shaft that you can also pull free. Besides the kink in it to clear the screws, the shaft should h=not be otherwise bent.

If it is, then straighten it. Now, push the upper shaft all the way down. You will need to push the side pins into the shafts to be able to completely collapse the shafts. Keep pushing the inner shafts down and push them so they come out the bottom of the outer shaft Remove the bushings from the middle shaft (the one you just removed from the outer shaft), and pull the bottom cap off. This bottom cap is probably what has been causing your problems with retraction, but we'll get to that later. Press the innermost shaft through the bottom of the middle shaft and remove the bottom cap from that. You now have the two bottom caps with spring loaded pins. Pressing on the plastic plunger on top of the cap should push the pin in, but excess friction may make this difficult, so you will need to add lubrication. Remove the plungers by pressing on the sides of them with something like a small screwdriver. This squeezes them together enough for the bump on the side to fit up out through the hole the plunger is in.
The metal pins will then come out. Be careful not to lose the springs behind those pins. Now you get to lubricate the metal pins. Mine were originally covered with a dry lubricant. I can tell by how black my hands were afterwards. Oh, did I forget to tell you to wear rubber gloves? Since I had no dry lubricant on hand, I just applied some grease to the angled flats, and the bottoms of the pins. Don't you hate it when they say "reassembly is the reverse of assembly?" Well, I'll have pity on you this time. First put the pins back in the appropriate caps and then press the plungers in (sorry, no pictures). Put the smaller cap on the inner shaft an put the bushings on. This is were it gets slightly complicated. Put the inner shaft into the middle shaft, making sure that the pin side is aligned with the hole near the bottom of the middle shaft If yo want, you can also lubricate the bushings. The finicky part is trying to get the inner shaft past the upper bushing.

The inner pieces of the upper bushing are a bit flexible. They should be flat against the walls of the middle shaft, but you can always push your finger in there to press them out. If you were able to get the inner shaft past the upper bushing, at some point the spring loaded pin popped out through the hole in the middle shaft. Press on the pin and push the inner shaft in a bit farther, then you can put on the other cap and bushings. Insert the middle shaft into the bottom of the outer shaft, making sure that the pin is sticking out opposite the lower hole in the outer shaft. No matter, the pin from the inner shaft is going to pop out through that hole. Press that pin in so the middle shaft sticks out the top of the outer shaft. Heck, also get the inner shaft to stick out the middle shaft. Luckily, getting the middle shaft through the upper bushing was easy. You may need to put the wire plunger into the inner shaft and press it down while pulling up on the inner shaft.

Hey, did you notice how easy it was to press that plunger down now that you've lubricated things? Now things are pretty much the reverse of assembly. Put the wire plunger into the tophandle, then push the handle into the inner shaft and screw it in with your two screws and the 2.5mm hex driver. Now you can test how well the handle retracts. Does it easily retract all the way? When retracting, you only need to press on the button when the handle is fully retracted. At the halfway point, you mere need to push down on the top of the handle to get the middle shaft to retract.things weren't too smooth for me, so I'll lubricate the pin that's sticking out of the outer shaft. It looks like there's a bit of deformation of the hole. i guess someone was trying to force it. If there's enough of the rivet left, reinsert it and try to flare the end as best as possible. I don't think it's strictly needed, but I may be missing something, so you may as well put it back just to be on the safe side.