myog backpack plans

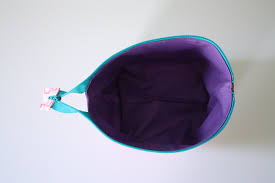
So, now that I have my hammock rocking out with the Whoopie Sling suspension, it is time that I figure out what to do about all these dang bugs we have! So, in my search to find a solution to deal with the bugs, I came across the Bug Sock which Randy Smith (AKA: Papa Smurf) features on his site: Dream Hammock. Not only does Randy offer these Bug Socks for sale (made in your choice of materials: Tulle, Noseeum, or Nanoseeum), but just as the name of Randy’s site implies, he also offers instructions so that anyone can make their own. So, this is just what I did… (**Since this posting, Randy has changed his site. His site is now called Dream Hammock, and I have corrected the links above. After quickly browsing through his site, it looks like the bug sock is only offered in nanoseeum, but I am not 100% sure. According to his site, more information on this item can be found on both, Just Jeff’s site, as well as SGT. Rock’s site.) Of the 3 materials that Randy list’s on his site, the Tulle seems to be the lightest per square yard.

However, I was unsure as to exactly what this was, so I searched the net for what Tulle actually is. What I found was that it is a very fine netting that is used in clothing items such as veils, gowns and ballet tutus.
osprey ayres backpackThen, after reading this, I went to Wal-Mart to browse through the fabric, and sure enough, I found some Tulle, and for only $1.27/sq yd!
backpack ke taman negara pahangSo, I purchased a few yards, came home and began making my own bug sock…
mcm duke backpack medium price So, once I got the Bug Sock all sewn up, of course I had to make sure that it worked.
mijlo backpack buyAnd who better than my daughter to help me test it out…

There are a few differences between the Bug Sock that I made and the Bug Sock that Randy sells. In the directions found on his site, he calls for some ribbon to help reinforce the edges, particularly at the foot end and then at the head end where the cord exits the Bug Sock and is cinched closed. I did not have any ribbon, so instead, I used some scrap ripstop nylon to reinforce the foot end, and I did not use anything to reinforce where the cinch cord exits the Bug Sock at the head end. So far I think that it will work fine, but only time will tell… Also, Randy suggests using a mitten hook at the cinch on the head end of the Bug Sock. I imagine that this mitten hook will help keep the bug sock centered along the hammock’s ridge line, as well as help to keep the Bug Sock pulled slightly taut along the length of the hammock. Unfortunately, I did not have any of these that I was not using, so again, I did not include this on my version either. The last thing worth mentioning is that I used some of Lawson Kline’s Glowire for the cinch cord at the head end.

I figure the Glowire will improve visibility at night. So, after I finished the Bug Sock, I dug out a DIY ripstop nylon stuff sack I made quite a while back that just so happened to be a good size for the Bug Sock. Once I stuffed the Bug Sock into the stuff sack I set it on the scales… 2.4 oz was the verdict. Even though Randy’s version is slightly less weight than this, I am still super happy with the overall results of my DIY Bug Sock… Spread the word:Like this:Send any questions or comments to the designer Roger Caffin I have spent a number of years trying to reduce the weight of my pack with lighter gear. Local manufacturers have to cater to the bulk market and make their gear strong enough that they are not inundated with returns from novices who don't know how to handle lightweight gear. They like to have a 'bomb-proof gear' reputation. But with that strength comes weight, so what's on the market here is really too heavy. I started to research the market for lightweight materials, and found that our local gear is made largely with stuff from 30+ years ago: there are much lighter high-tech materials available now.

So I started developing my own gear, and found I could significantly reduce the weight. You can see the results on the Ultra-lightweight page. What to do with all this information? I am sure it might be of benefit to others (he hopes!). So I decided to document my designs and make them available through the FAQ site. If you want to reduce the weight of your pack, read on. But read the Disclaimer on the /FAQ/ page as well. You didn't think you could just have designs without some discussion of my general design philosophy, did you? A lot of it is actually written up on the Ultra-lightweight page, so I won't repeat (all of) it here. You will get my own biased opinions here rather than some attempt at an unbiased concensus. I should add right here that this information is provided for your entertainment: bushwalking and mountaineering are hazardous sports and you do them at your own risk. What does this page offer? I am putting my ultra-lightweight designs here for anyone to copy for their own private use.

In some cases I can make fairly detailed plans available, while in other cases the information is still being put into a releasable state. Even so, the ideas are there for free. I retain copyright over these designs, and commercial use is not authorised. If you want to make an item for yourself using my design, feel free. If the prospect is a bit daunting, I could be persuaded to make the gear up for you (given adequate time - sorry). However, no responsibility is accepted for what you do with the gear. April 2012: I am trying to get a firm interested in commercial production. While this is happening the detailed plans are on hold. The tent designs were developed on various CAD systems, but the actual shapes have been described mathematically and come as spreadsheets of (x,y) positions along all the edges. Other details are given in the accompanying documentation. The tent poles and joiners, and especially the bent joiners at the apex of the poles, do get a little technical. A workshop may be needed.

There didn't seem a lot of point in putting all the numerical data for the tents on this web site, so for the present send an email request to me at the address above saying which tent design you are interested in and I will try to send you a zip file. If you want the design altered slightly, let me know and it may be possible as some of the designs are mathematical. The zip file will contain both the spreadsheet data and some documentation describing how to sew the design together. Doubtless this will be incomplete, so you may need to ask for further hints. Some experience in sewing is needed. The pack details are simpler and the information may be a little more sketchy at this stage. The pack bag design is simpler as it is mainly square, but the frame is very technical. However, a simple copy is possible using slightlky lower tech materials. The sleeping bags are a different proposition again. Designing a sleeping bag is not that hard, but getting the really light down-proof fabric and the down is more complex.
Both of the Australian gear repair companies (Venus and Rapid) can fill bags for you. However, I do not know what quality down they can provide. I am also working with one major gear maker on this: he may be willing to fill bags with top quality down for a reasonable charge as well. You can fill a bag yourself if you want, but be prepared to have a house ful of floatie down for the next week! For the rest, see the Sleeping Bag page. One piece of equipment we all need, and use at home every day, is a pillow. But try to buy a realistic lightweight pillow in the shops, and face frustration! Most walkers try to use a bag of some sort, and stuff it with spare clothing at night. But every time the subject comes up in discussion, you find that no-one is very happy with the result. And when you are into the ultra-lightweight style in mid-summer, there may not be a real lot of spare clothing available anyhow! So the scene is ready for a good lightweight pillow. In winter 2003 I wrote here "Yes, all this is leading up to the announcement that I have reached the prototype stage with a UL pillow.

It is soft, as thick as a normal pillow used at home, and weighs about 75 gm. Field trials are progressing. I have to admit things did not go as well as expected - surprise! I tried using inflated pillows of various sorts, but they were either very noisy or my head rolled around on top of them. So the project went into hold mode while I worked on the packs - my apologies to all who emailed me asking for details. However, the latest version has been more of a success. Before describing it I should give some background. I have been using bits of open-cell foam from places like Clarke Rubber as a temporary pillow, but they were either too soft once warmed up or too hard (like the last bit I bought). So I had a look at the internals of a good Dunlopillo pillow. It is foam, but the foam is full of long holes like corings. I thought this might work with the slab of foam I had bought from Clarke Rubber (the heaviest open cell foam they had), and ran the experiment. This is illustrated in the following sequence of pictures.

I took a bit of thin-walled stainless steel tube about 25 mm diameter, sharpened it on end and mounted it in a drill-press. I imagine a pistol drill might work almost as well. Then I created a grid of holes on a sheet of paper, stuck this on top of a block of foam about 190 mm x 230 mm x 100 mm high, and did a long 'cork-boring' effort. This gave the left-hand picture. Then I wrapped a bit of Polartech 200 fleece around the foam to give the middle picture. Finally I put some ordinary poly-cotton sheeting around it as a pillow-slip, to give the right-hand picture. I prefer to sleep with my face on (poly)cotton rather than pure synthetic: it just seems more comfortable. This design worked very nicely: it held my head up all night, it did not make a noise, and it did not let my head roll around either. Normally the foam would soften when it gets warm, but this did not seem a problem here. It weighs about 100 grams, which is not bad for a good night's sleep. Some words of advice should you want to make one.